-
JBuilder
Information about the JBuilder software package. Trial
versions are available. Amazon.com is still selling JBuilder 6
(new/used).
-
BreezyGUI - DOWNLOAD files below. We will be using these files for Input, Output, and Graphical
User Interfaces.
|
We have obtained permission from the authors Dr. Kenneth Lambert and Dr. Martin Osborne to post the BreezyGUI files that are used in our materials. Their website is in transition.
First, install your JBuilder software.
Configuring the software to work with our BreezyGUI
libraries:
(after you download the BreezyGUI files)
- Download the BreezyGUI files (they are free).
To obtain a complete set of libraries, download BreezyGUI,
BreezySwing and TernimalIO.
- Remember "where" you put the files. Be sure to download the
.jar
files.
- Open the JBuilder software, select menu option Tools and then
Configure Libraries.
- This pops up a dialog box that you complete in this manner:
-Highlight folder User Home (on the left side at the top)
-Choose NEW at the bottom of the left side.
-Type in MyLibraries (one word) to replace "untitled" and
hit ADD.
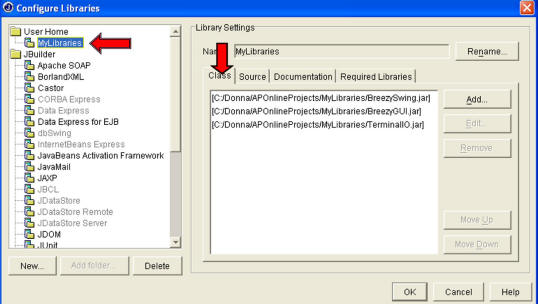
-Now, go to the right side of the Configure Libraries Screen and choose ADD to add
new libraries. Be sure the tab "Class" is selected.
-Find the BreezyGUI.jar file (where you put it) and select it.
Now, click ADD again and choose BreezySwing.jar. Once
more, click ADD again and choose TerminalIO.jar.
- Your Configure Libraries window should now look like the sample window below.
(Note: I downloaded my Breezy files into the location called "Donna/APOnlineProjects".
Your Breezy files will have been downloaded into a folder with a different
name and location on your computer.)
-
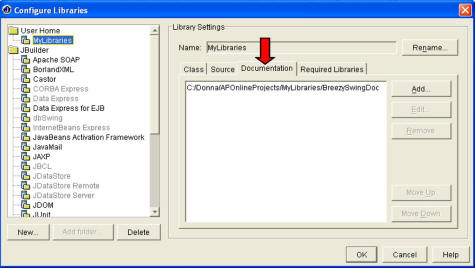
In the same window (the one shown above), indicate the location of online documentation associated with the
jar files. Select the DOCUMENTATION tab, select the ADD button
on the right, and
navigate to the documentation's location. All documentation is
included in the file BreezySwingDOC.
-
Also in this same window, select the tab REQUIRED LIBRARIES tab,
select the ADD button on the right, and choose MyLibraries from the pop-up
list.
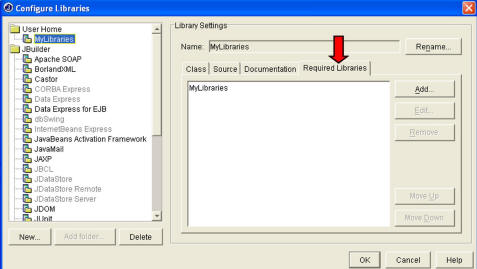
- Now, finally, click OK to close this CONFIGURE LIBRARIES
window.
Hang on . . . there is more to be done!
Adjust the PROJECT DEFAULTS to include MyLibraries:
- From the JBuilder screen, select menu option PROJECT from the top JBuilder menu bar.
Choose Default Project Properties.
- **** To get BreezyGUI to work with JBuilder,
you must set the Default Project Properties page in JBuilder to "Required
Libraries" and add MyLibraries (as seen on the screen below).
Here is how it is done ...
- Click the "Required Libraries" tab. Choose ADD.
Highlight MyLibraries and click OK. Your Default
Project Properties page should now look like the screen below.
- Click OK to close and return to the JBuilder screen.
To set the path default options in the Default Project Properties, see
Set the Default Settings on your
JBuilder Software.

- All done!
|