|
You may want to print out these instructions to use as a
guide
until you become more familiar with JBuilder.
- By now, you should have created a folder on your C drive called MyJavaProjects.
For your first demo program in JBuilder, you will need to add a file to
this new MyJavaProjects folder. Right click on the file below and save
it in the folder MyJavaProjects as C:/MyJavaProjects/Multiply.java
Multiply.java
Now, let's make our first project. Remember:
It is
necessary to create a project for every program you write in JBuilder.
- Access the JBuilder software and have it open on the screen.
- Click on File on the menu bar and then click on New Project.
Next to Name: type LabDemo
Notice the line next to Directory: C:/MyJavaProjects/LabDemo
will automatically appear.
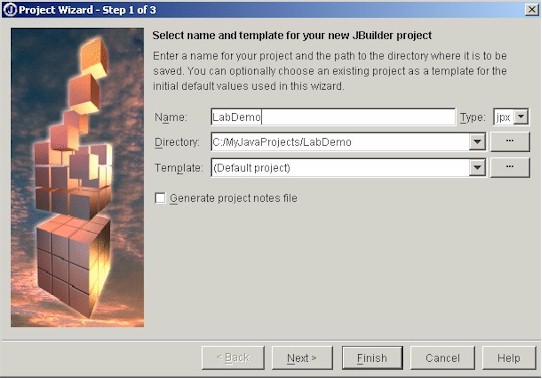
If you have your path default settings in place, you can just
click Finish.
If you need to set default paths, cancel, and go to
Setting Up JBuilder.
4. To add a pre-existing
.java file
to the project, right click on LabDemo.jpx (as it appears in the area to the
left), choose Add Files/Packages ( or
the green + ), find the files you wish to add and choose them. For this example, add the file that you
downloaded to your project file, Multiply.java. Click
OK.
You should
see the addition of the file on the left side of the screen under LabDemo.jpx.
Double click on Multiply.java to see the source code appear in the window on
the right.
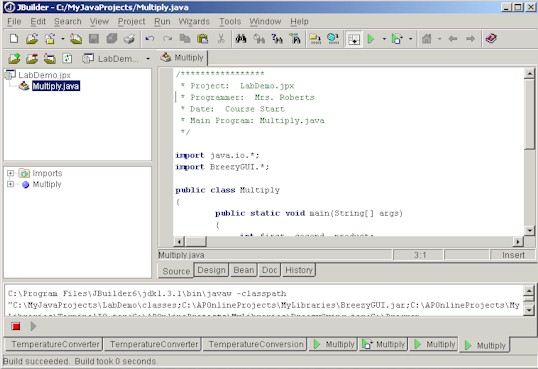
Notice:
The project name (LabDemo) and the program.java name (Multiply.java)
are different. Also notice that the Multiply.java name and the "public
class Multiply" (in the program) display the same.
Remember:
The project name and the program.java name must be DIFFERENT.
Do NOT give the project the same name as your program!!!
5. Click on Project in the main menu and choose
Make Project, the first line.
The words "Build Successful" will appear on the
bottom left of this same screen.
6. Click on Run in the main menu and choose the first line
Run Project. The
following window will appear waiting for you to tell the project which file
contains "main". (This can also be set under Project /Project
Properties.)
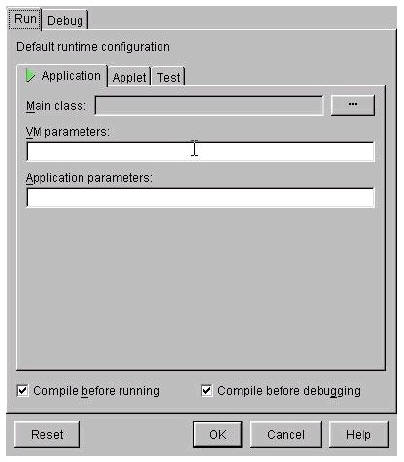
7. Click on the ellipsis (...) after the label "Main class." You must select the
file that has the main method. In this example, the main ( ) is in
Multiply.
If you cannot find your
file, type in the name of the
file. It
is not necessary to fill in VM parameters or Application Parameters.
8. Click on OK and the program will run. You will be asked to input the first
integer. Click on the space after the word integer and type in an integer,
press enter. You will be asked to input the second
integer. After typing in a second integer, press enter. You will be asked to input the product. Enter an integer. Practice running the program for several inputs.
9. To be able to print or save your output, highlight the bottom of the
screen by dragging the mouse over it, right click and choose "Copy Content". Then access
Notepad, ( under Start/Programs/Accessories), and choose edit and
click on paste. You may then save it as C:/MyJavaProjects/LabDemoOutput
(or something similar).
10. To save and terminate the session, in the main menu, click on
File and
then click on Close Projects. Click on
All for the following window. And
then click on OK.
To clear the display window at
the bottom of the screen, right click in that area and choose Clear All. 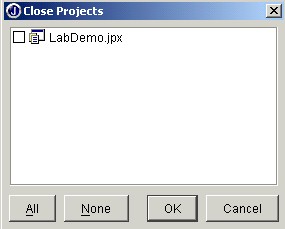
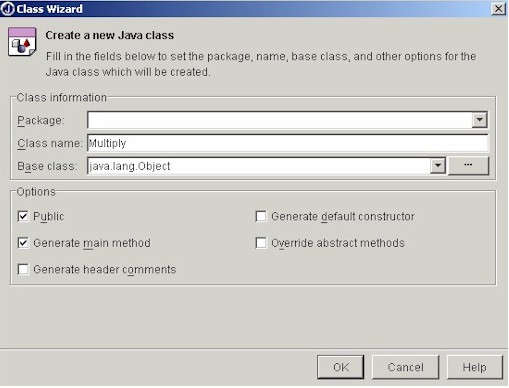
11. To create your own .java file:
Choose FILE/NewClass and the following window will appear.
Remove the
Package name if one appears. Enter the name of your .java file (which is also the name
of your class). Check only Public and Generate main method.
When the working screen appears, be sure to insert your
documentation and your imports.
|